Dye-ing at the Museum

July 19, 2019

On Saturday, June 29 the Chilkat Dye Working Group got together at the museum for some hands-on dye experiments. Here’s some images!

1 A dye dock

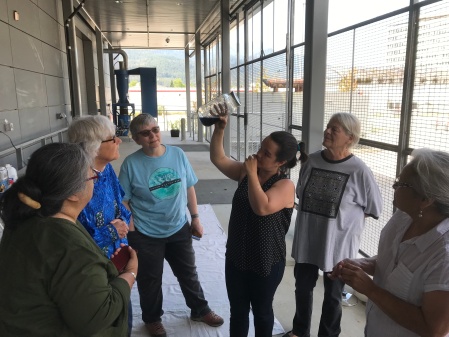
Looking at copper and ammonia dye in a jar on the loading dock of the Alaska State Museum. L to R: Deanna Lampe, Mary Ann Parke, Deb O’Gara, Lily Hope (holding jar), Kay Field Parker, and Liana Wallace.

1 A scour

Ecolana organic undyed merino wool tied in small hanks for testing, and ready to be scoured with Fels Naptha soap. Scouring removes dirt, oils, and contaminants from the wool and hopefully makes the dyeing more successful. I also had hanks that were not scoured for comparison.

1 A scoa soak

Here is Ecolana organic merino wool in small hanks soaking for an hour in distilled water before dyeing. One bowl is the scoured wool, the other is not scoured.

1 copper

On my back porch, the jar with the yellow liquid is urine with a piece of copper pipe in it. Urine as a chemical has a huge number of traditional uses…dye mordant, cleaning solution, aid in beer making and gunpowder production…google the word “lant” for a rabbit hole of fascination! Aged urine gets more alkaline, eventually having some properties of ammonia, but as you can see the jar on the right (containing ammonia and copper) is far more reactive than the urine on the left, which I don’t think is aged enough. Note the deep cobalt blue color.

2 copper

Here is a glass pitcher with my copper pipe and ammonia. After a while, there was a white residue, or precipitate, in the bottom of the container as well as some black staining on the inside of the glass near the top of the liquid. When I agitated the solution, it turned this milky blue.

3 copper kay

This is Kay Field Parker and her bottle of ammonia with a copper pipe that has been sitting on her porch for more than a year.

3 copper

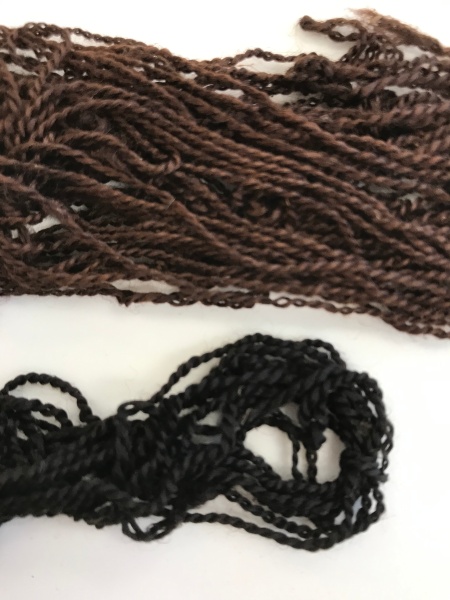
Unlike many of the dyes we are using, the ammonia and copper solution is NOT heated (that would produce dangerous fumes). It is used cold. Yarn put in this solution turns a deep steely gray, only slightly blue.

5 copper gray

Copper is an important colorant on the Northwest Coast, and the blue greens are the dye color we are looking for. Obviously, this is not what happened to our wool yarn.

5 copper

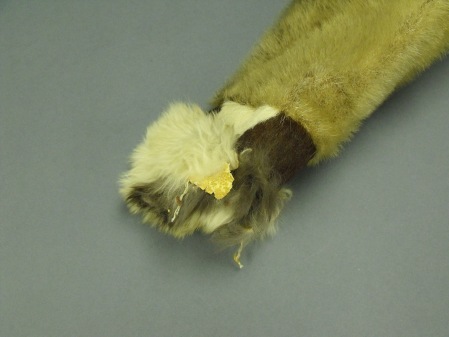
On the left is Louet brand merino wool with no color, and then dipped in copper/ammonia. Lily holds some green Louet yarn and what happens when it is dipped in the copper/ammonia.

6 patty experimental

Patty Fiorella has been experimenting with local plants and the kinds of colors possible. Here she has some sweet gale.

7 patty nettle

These are nettles, but Patty felt they were not good quality and perhaps it is too late in the season. Using natural dyes means a lot of variables and the results are both art and science.

8 patty's setup

Here is Patty Fiorella’s dye bath setup, with enamelware pots on hot plates. Aluminum pots are avoided because they might impact the reaction. She boiled the plant material for an hour, strained it out with cheesecloth, let it cool, and put the yarn in to soak up the dye.

9 a wolf moss

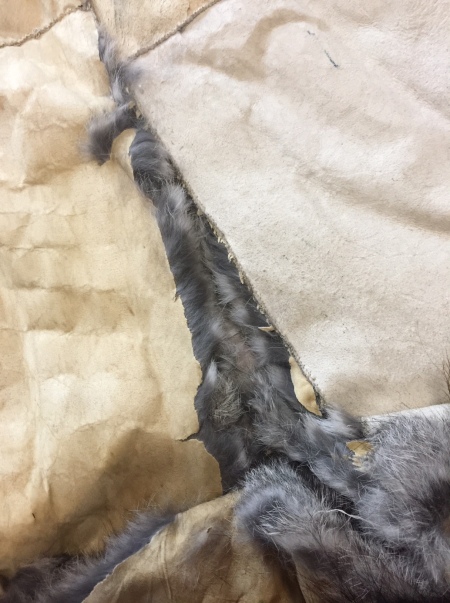
Liana Wallace holds a bag of wolf moss (a kind of lichen) and discusses its use with Juneau-Douglas City Museum curator Niko Sanguinetti.

9 wolf moss changed

Lily Hope holds some dry wolf moss (top) to compare with the appearance when it has been boiled for an hour in urine. The colorant is now in the dye bath. Yes, there is a bit of an odor. That’s why we are outside!

10 wolf moss faded

Kay Field Parker shows us some wool yarn that has been dyed with wolf moss. The deeper yellow on the right has been in the dark for the past 18 years. The lighter, faded yarn is the same yarn, but has been exposed to daylight for a year.

11 A cook

Here are some steel pots on a pancake griddle. The plant material, distilled water, and yarn are all being brought to a boil and heated for an hour together. This is one option for dyeing, but the yarn will have plants bits in it.

11 B setup

Here are more tables with dye baths on burners during this dye session.

11 cow parship wolf moss

Here are two yellows we got this time…on the left is wolf moss (which is a little on the pale side, I have seen it a deeper yellow. Perhaps it was a weak dye bath this time?) On the right is a nice golden yellow made with cow parsnip blossoms in urine. Certainly there were a lot of traditional uses for cow parsnip, so I suspect this color doesn’t last or Chilkat weavers would have perhaps used it more?

12 loading dock

Another image of the scene on the loading dock.

14 labrador IMG_6890

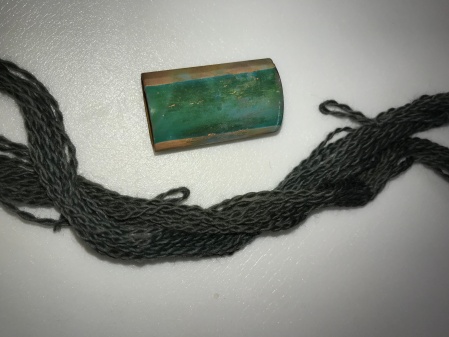
Here are labrador tea leaves Mary Irvine gave me, gathered last year in Sitka. The dye bath smelled lovely, but the resulting color was not very exciting.

16 labrador boring

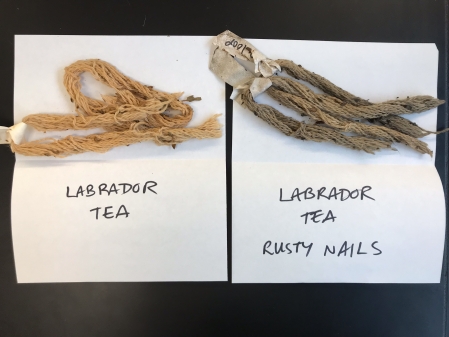
The labrador tea with just distilled water gave a weak beige yellow. Adding rusty nail water and nails gives a weak brown. We are looking into the idea of iron as a mordant, but I don’t think this looks so promising.

17 hemlocks

These were wool yarn samples Kay Field Parker provided from her experimentation with hemlock bark in 2018, and also hemlock bark overdyed with the copper and ammonia solution. These are pretty good dark colors!

18 hemlocks colors

A little blurry, but you can see where the nice brown of the hemlock bark dye got much darker in the bottom sample after she dipped it in copper/ammonia.

19 hemlock exhausted

Kay Field Parker gave me her hemlock dye bath from that 2018 wool dyeing she did, and I thought I’d see if it still worked. NOPE! I guess the dye bath was used up or “exhausted” as they say.

20 dry

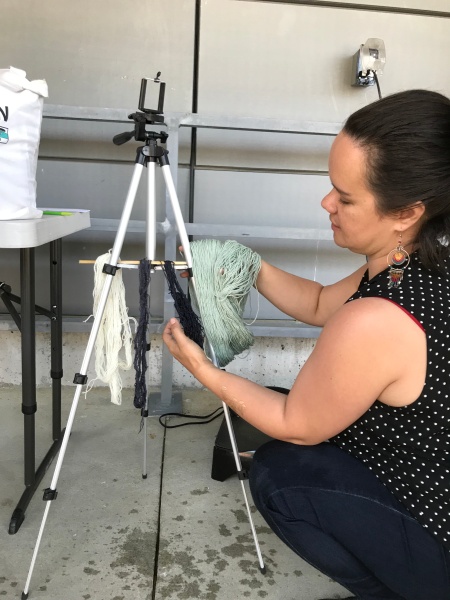
Here’s some yarns drying in the conservation lab after the meeting. I’ve got a few small hanks left I can experiment with next time.

21 light fading

I hung examples of the cow parsnip, copper, and wolf moss in the window (both scoured and unscoured) and put the rest of the hanks in a dark drawer. After a few months exposure, we will see how much fading might happen.


Spruce Root Weavers and Basketry Repair at the Museum

February 7, 2019


In the fall of 2018, the conservation lab at the Alaska State Museum offered a spruce root basketry repair class specifically for spruce root weavers. This was the same class I had given at the 2016 Museums Alaska conference, mainly to museum professionals. During that earlier class, two participants who were spruce root weavers suggested the class would be interesting to other weavers. Several conservators also took the class, and suggested it would be interesting to offer at a conservation conference. The November 2018 class for weavers was a five-hour course, with a free kit. It included hands-on learning of the Japanese tissue and wheat starch paste repair technique, examination of 40 damaged baskets in the ASM conservation study collection, a review of the pros and cons of the old repair techniques on baskets in the museum collection, and an informal discussion of cultural priorities in basketry repair.

1 setup

View of the Alaska State Museum objects conservation lab set up for the spruce root basketry repair class, November 3, 2018

The class took place in the Alaska State Museum objects conservation lab with eight experienced weavers, both Native and non-Native.

2 supplies

The free kit supplied to each weaver.

The supply kit the weavers got to keep included tiny scissors, fine pointed tweezers, paste in a plastic container, a small pouch of dry wheat starch paste powder (Talas #301), distilled water, small paintbrushes, Japanese tissue, a felt pallet, and references (see below).

3 Spruce root repair class

View of the lab showing the weavers at work testing the current repair technique and viewing old repair techniques

Study baskets on the table in the foreground. Hans Chester and Yarrow Varrow look at old repairs on baskets from the museum collection on the multi-tiered cart. Kay Field Parker (standing in the purple) observes the work of Pamla Credo-Hayes. Seated L to R are Della Cheney, Marcia Stier, Liana Wallace, and Irene Lampe.

4 sample

Example of a basketry tear, the splints unpainted, and the painted finished repairs in sequence

An example of the technique. You see the open tear to the left in the image, then 8 vertical white “splints” of twisted Japanese tissue held in place with starch paste to close the tear. Note that some are thicker, and some are thinner. Thinner ones grip better and are easier to hide. Next to the white splints are 6 more that have been toned with acrylic paint and nearly disappear.

5 Pamla Credo Hayes

Pamla at the basketry repair workshop

Pamla Credo-Hayes in the process of dragging a tiny twisted Japanese tissue splint through the paste just before she applies it to the tear.

6 Irene Kay Liana

Irene, Lay, and Liana at the basketry repair workshop.

Irene Lampe experiments with larger splints rolled on her palm, while Kay Field Parker looks at Liana Wallace’s repair setup.

7 Liana's tools

Liana’s equipment

Liana Wallace brought in her own lighting and magnification equipment, which clips to the edge of the table. The basket is sitting on sandbags for support and has two pieces of thick curled blotter paper sandwiching the tear in the basket wall, held gently with clothespins to allow the tear to be held in alignment.

8 Della Cheney

Della at the basketry repair workshop.

Della Cheney works a tissue splint in the paste. She brought in a classic reference book on spruce root baskets by Tlingit scholar Louis Shotridge. Della Cheney is a well-known Haida weaver in several media and has particular expertise in spruce root. Della’s sister-in-law, Edna Jackson, is known for her expertise in papermaking. Papermaking was discussed in regards to the Japanese tissue splints.

9 Della's book Liana's bark

Della’s book and Liana’s gift of cedar.

I bought Della Cheney’s book about cedar bark weaving, Weaving Our World, at a local bookstore, but last I looked it was available on both Xlibris and Amazon. Della spoke at the workshop about the challenges and successes she has experienced repairing cedar baskets, and the dilemma of how to reshape cedar bark hats that get wet if they are worn outdoors for ceremonies and cultural events. (after all, Southeast Alaska is a temperate rainforest). The cedar in this photo is courtesy of Liana Wallace, who donated it to the lab for exploration of indigenous repair innovations.

10 Hans and Yarrow

Hans and Yarrow innovating at the basketry repair workshop.

Weavers Hans Chester and Yarrow Vaara discuss what kinds of repairs might use indigenous materials, including spruce root, cedar bark, and perhaps handmade paper from local plants.

11 Yarrow demonstrates

Liana, Irene, Marcia, Yarrow, Hans and Kay at the basketry repair workshop.

Yarrow Vaara (grey shirt) demonstrates her ideas about splinting robust basketry material with spruce root. Observing from L to R around the table are Liana Wallace, Marcia Stier, Hans Chester, and Kay Field Parker. In the background, Irene Lampe adjusts the basket she is repairing.

12 Yarrow's splints

Yarrow’s splints on an old basket.

Detail view of damaged area of the study basket, showing an area dampened to increase flexibility, and thin splints of spruce root worked through the wefts to replace broken warps.

13 trimmed splints

Yarrow’s splints on an old basket after trimming.

Detail view of the same area dried and trimmed. The splints could be toned to match with acrylic paint, and the splint could be inserted on the inside to hide the exposed ends. While the Japanese tissue and starch paste technique is an effective, gentle option for museum conservation and some baskets in the community, these repairs are quite delicate would readily fail on basketry objects (such as hats) still needed for active ceremonial or cultural use.

I’m offering another spruce root repair course for conservators at the American Institute for Conservation conference. The half-day workshop will take place May 13, 2019 at the AIC’s 47thAnnual Meeting in Uncasville, CT. The workshop will include the Japanese tissue and wheat starch paste technique, but also discussions about what I learned from the weavers. I am interested in what is happening to make space in museum practice for indigenous authority and what kinds of collaborations conservators can initiate. I am grateful for a stipend received from AIC and its Objects Specialty Group to travel to Connecticut for the AIC conference and I look forward to reporting back on this weblog what kind of feedback I get from conservators about the insights shared by the weavers. I am very much hoping to discuss issues of indigenous authority further with conservators during the conference, looking for examples of successful collaborative practice and making space for Native voices. The Alaska State Museum conservation lab has been active sporadically in this endeavor, but more recently we’ve been thinking about it more strategically.

The references I printed out for the weaver’s kits included the following:

Florian, Mary-Lou, Dale Paul Krinkright, and Ruth E. Norton (1990) The Conservation of Artifacts Made from Plant Materials. Princeton University Press, Princeton.

Gleeson, Molly and Samantha Springer (2008) “Collaborative Work Towards the Preservation of Spruce Root Basketry as a Living Tradition.” American Institute for Conservation Objects Specialty Group Postprints, Volume 15.

McHugh, Kelly (2008) “Living Our Cultures: Consultations with Elaine Kingeekuk.” ICOM-CC Working Group: Ethnographic Conservation Newsletter. Number 29 pp. 13-14.


Chilkat Dye Project

September 18, 2018

INTRODUCTION to the Chilkat Dye Project

shows detail of a Chilkat robe

Detail of Chilkat robe, showing face and four main colors: black, white, yellow and blue. Alaska State Museum collection II-B-1744

Are you a Chilkat weaver at any level of experience? Or have you studied these robes and want to share with weavers? Do you know things about natural dye technology that might help us? Please connect with us… the Chilkat Dye Working Group is exploring many facets of Chilkat weaving beyond the technical aspects of the grant…

A five-year $1 million grant from the Andrew W. Mellon Foundation has established the Pacific Northwest Conservation Science Consortium. The consortium is headquartered in the chemistry lab of Dr. Tami Lasseter Clare at Portland State University and includes five institutions:

  • Portland Art Museum (Samantha Springer, Jeannie Kenmotsu, Donald Urquhart, Kristin Bayans)
  • Seattle Art Museum (Nicholas Dorman, Geneva Griswold)
  • Alaska State Museum (Ellen Carrlee, Liana Wallace)
  • Jordan Schnitzer Museum of Art at U. of Oregon (Anne Rose Kitagawa, Chris White)
  • University of Washington Libraries (Justin Johnson, Stephanie Lamson)

The initial meeting of consortium members was August 16-17, 2018 in Portland. Among the projects proposed, Ellen Carrlee and Liana Wallace at the Alaska State Museum initiated a Chilkat Dye Project for analysis and identification of the dyes used on particular historic Northwest Coast Native Chilkat robes. Ethnographic sources and contemporary weavers describe some of the natural dyes used in the past, but there are few studies linking known robes to specific dyes. Research on organic dyes is beyond the scientific capacity of most museums. A working group of Chilkat weavers and museum staff meet monthly at the Alaska State Museum to share data and ideas.

PHASE ONE

  • Begin monthly meetings of Chilkat Dye Working Group
  • Inventory of the known historic and contemporary dyes typically used (ie hemlock bark, wolf moss etc) through oral history and literature review
  • Procuring samples for baseline analysis and sending to Portland
  • Development of a reference database for Chilkat dyes
  • Discuss project with consortium

PHASE TWO

  • Send samples from old robes to Portland for analysis and identification
  • Look for patterns to help interpret makers, locations, and dates for robes
  • Connect research to Regalia exhibit at Alaska State Museum, summer 2020
  • Consortium to meet in Juneau, summer 2020. Celebration? Public program?

PHASE THREE

  • Share knowledge, ie Clan Conference, Celebration, public programs, social media
  • Develop educational materials to enhance science, technology, engineering, art and mathematics (STEAM) education.
  • Publication of articles for various audiences

Contact: Ellen Carrlee ellen.carrlee@alaska.gov

Chilkat salmon trout head detail of robe

Detail from Chilkat Robe in the Alaska State Museum, II-B-1744, showing what is sometimes called “salmon trout head” in the traditional Chilkat weaving colors of white, black, yellow, and blue.


Cleaning Native Leather In Use?

January 29, 2018

0B36C027-6E3D-4D9E-8466-4CC46E728E8A
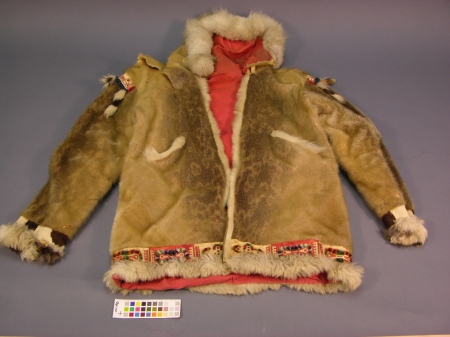
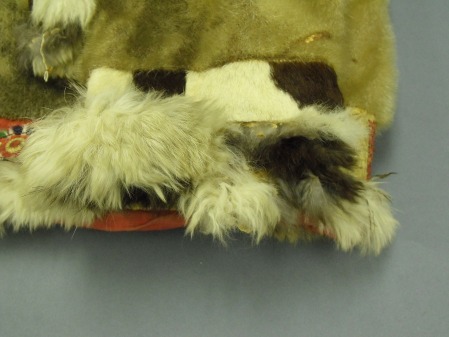
This beaded leather Athabascan vest is the subject of a recent question to the Alaska State Museum: tribal members want to know how to clean leather. The tribe is conducting interviews with members to record the meanings and origins of important regalia and taking photographs. This vest is the Chief’s vest, and still in active use. The tribe does not have a large number of cultural heritage pieces, making it rare and important. Elders still wear items of regalia like this, and some elders may “take them on their journey at their end of this life.” The Cultural Program Manager for the village traditional council is wondering how the normal soiling from years of use might be cleaned, and how they might provide ongoing care for things like this.  We need to take into consideration museum care standards but also the cultural need to continue using the vest.

I love this question because we are hearing it more and more at the Alaska State Museum…how to support the care of objects in active cultural use? On the one hand, there are commercial products that might reduce some of the stains seen here, but those chemicals might shorten the longevity of the leather. Proprietary commercial products often contain extra chemicals that are not useful and can be harmful, and the strength of the active ingredients can be much more harsh than we would use in a museum setting. In the museum setting, the prevention protocols would be very strict and we’d be aiming to preserve this vest for around 500 years.


I’m not certain the exact leather technology we are seeing in the photo, but if I had to guess I would think perhaps a Native-tanned moosehide (perhaps similar to the technique currently being collaboratively studied at the Anchorage Museum…keep an eye out for the report on that project). The thickness, color, and Athabascan origin make me think it might be moosehide. You can see a fuzzy suede-like layer on the front of the vest, and a grain layer on the interior of the vest. If a leather is flexible, everything but the grain layer is like a felted tangle of collagen (skin protein) fibers. The grain layer is the layer that had the fur…the layer we typically see on the outside of a motorcycle jacket or baseball glove. Some Native-tanned leathers have the grain layer removed. But behind the grain is that felt-like tangle. The suede-like part. The flexibility of leather is maintained by the tanning process which lubricated the fibers to prevent them from binding up with each other. This happens BEFORE the leather is dried, which is part of why WE DON’T USE LEATHER DRESSINGS: https://museumbulletin.wordpress.com/2012/11/21/alaska-state-museums-bulletin-58/

Here’s the tricky part…the cleaning techniques conservators like to use on leather are usually done dry (things like vacuuming, the dry use of soot sponges or urethane sponges, gentle cleaning with unvulcanized rubber such as Groom/Stick or vinyl such as a white eraser…) These can be a little bit abrasive, pull up fibers, or deposit crumbs of the cleaning sponge in the structure of the leather, but it is hard to cause serious damage with those techniques. Unfortunately, those techniques don’t tend to get rid of greasy soiling, such as from body oils, sweat, or food residues. In order to remove that kind of soiling, conservators might turn to wet techniques (distilled water with various substances added to enhance cleaning, detergents, solvents etc). But the danger in going with wet cleaning is that the things intentionally put in the leather during its manufacture that keep it supple and soft can ALSO be cleaned right out or moved around by wet techniques. This can result in stiff, shrunken, darkened, or distorted leather. It could also cause the stains to simply move around or go deeper into the leather and not actually come out.   In other words, the kind of aggressive techniques needed to make stains like that come out might actually make things worse. Museums often accept a certain level of use-related staining as part of the object’s history. This might not be appropriate for ongoing cultural purposes.

I put this posting out on the blog here to stimulate discussion about the risks and possibilities for cleaning and caring for this kind of item. It is more precious and special than most of the things in our closets at home, but it is also unreasonable to expect museum-level protection for something that is still in active service. I think where we are headed is for folks with museum expertise to provide as much USEFUL information as possible to the folks tasked with caring for these items, and empower them to pursue the kinds of solutions that work in their communities. I’ll provide an update to this post when the conversation has gone further…

UPDATE 2/3/2017:

I asked others in the objects conservation profession for ideas on this cleaning dilemma, and as usual my colleagues were very generous with their knowledge and advice. Choices for cleaning this vest include a wide range of options, each with pros and cons. On the most conservative end of the spectrum is the possibility of doing nothing, and accepting the “wear polishing” as a confirmation of the history, heritage, and authenticity of the garment. Next gentlest is the use of relatively crumb-free cleaners used dry, such as white foam cosmetic sponges, or “soot” sponges marketed under such names as Absorene, Smoke-off, and Gonzo. Sometimes soot sponges (vulcanized rubber sponges) do leave some crumbs, but they are often sizeable and easy to vacuum off. Someone suggested there might be risk of removing or reducing possible smoke tanning in the leather with a soot sponge. Dry, powdery cleaners were also suggested for soaking up the oily staining: warm dry cornmeal, baking soda, corn flour, Fuller’s Earth, or powdered erasers were mentioned. Any of those would then need to be removed from the surface, and might be difficult to remove entirely or might leave a residue. For example, corn flour might leave a scum of corn oil? A thin absorbent tissue in between might reduce the residue transfer, but might also block absorptive action. Removing the powdered cleaners might be trickier than expected, and enough suction to remove the powder could also remove some leather fibers. Somewhat more aggressive is the suggestion that roughing up the surface to scatter the light might help the stain look lighter, even if it did not go away. For example, gently rubbing the surface in a rotary motion with a paintbrush, or even micro-abrading the surface with a scalpel under a binocular microscope. On the most aggressive end of the spectrum were techniques that might use petroleum distillates such as Naptha or white spirit to dissolve the oil, or other water/detergent or solvent-based cleaning options. There were even suggestions of solvent cleaning mixed with lecithin to replace fats that might be pulled from the leather by solvents. Oily substances are both a stain component but also a natural part of the leather. The “wet” cleaning techniques offer the highest risk for damage in the form of stain movement, tidelines, stiffening of the leather, matting of the surface, or other undesirable effects. The wet techniques are most likely to give dramatic results, but come with the most dramatic risks too. Anything attempted along those lines (or the use of commercially available leather cleaners) should perhaps start with a really tiny area inside the pocket? Testing inside the pocket is a good idea with any technique. What this all comes down to is the ultimate goal the community has for the cleaning of this vest, and comfort caretakers have for the risks. Museums can share the ideas and techniques used in the conservation lab, but my goal is to make an object last for 500 years and that might not be the purpose of this particular vest. One final thought …investment is often made in retaining skills, relationships, and knowledge about technologies so new beaded leather vests can be made, too. There are Athabascan beaders and skin sewers who know how to make new vests, and this is a complementary preservation technique too. Thank you to everyone who shared in this conversation! I hope to post another update later on…


Glass Photo “Mammoth” Plates?

September 13, 2017

IMG_2875
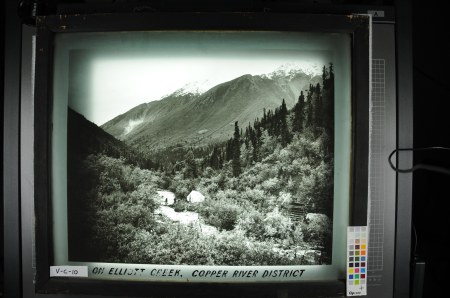
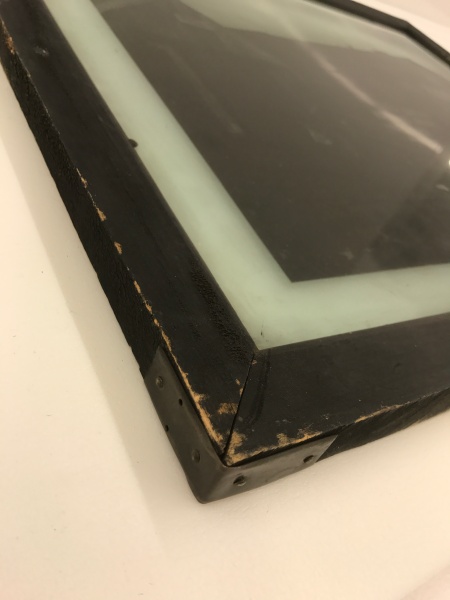
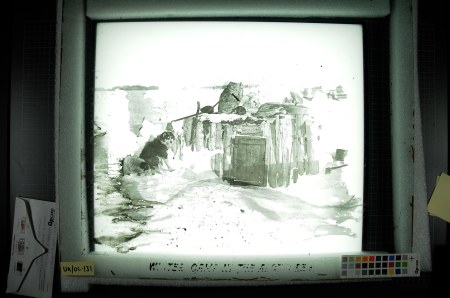
So, my photography-loving friends, what are “mammoth plates” and do these count? Glass measures 24″ x 20″ and framed they are 26″ x 22″. They are a lot like lantern slides because they have some sort of emulsion trapped between two sheets of glass and the image is hard to see without light shining through it. But when you do shine the light oh my! Because of their size, the detail and relationship to the viewer is impressive. Are these rare? Is the technique itself compelling? They were cataloged into our collection in the 1960s, and the database suggests they are “dry plate” or “transparency” but I’m not sure those are the correct terms for the photographic process used.

We are considering pursuing treatment of this collection of 1903 images by the Miles Brothers. Seems these photographers came to Alaska during the gold rush at the behest of a railroad company and took pictures meant to attract investors? It was probably the Valdez, Copper River and Tanana Railroad Company. We believe the images were later displayed at the AYPE (Alaska-Yukon-Pacific Exposition) in Seattle in 1909.  The Miles Brothers are better known for their early motion picture work, and had a studio in San Francisco. The negatives from this Alaska venture were apparently lost in a fire following the 1906 San Francisco earthquake.

I don’t know if we’ve got a complete set here, probably not. Our first image is from  Southeast Alaska, and then they seemed to go up to the Valdez area and headed for the Yukon River and finally out to the Bering Sea. The sequence below is my best guess, corrections welcome.

ASM_V_C_9

Taku Glacier on Taku Inlet. 1903 Miles Bros image, Alaska State Museum V-C-9. Note the strange brown bubbled area in the middle. Can this be fixed?

ASM_UA-UC_136 Merged

Glory Hole of Treadwell Mine. 1903 Miles Bros image, Alaska State Museum UA-UC-136. This plate is broken and the glass itself would need repair

ASM_V_C_14

Hawkins Point on the White Pass & Yukon Railway. 1903 Miles Bros image, Alaska State Museum V-C-14

ASM_UA-UC_137

Fort Liscum, Military Fort on Valdez Bay 1903 Miles Bros image, Alaska State Museum UA/UC-138. I noticed online there is a nice image of this at the Anchorage Museum, apparently belongs to the Cook Inlet Historical Society. I don’t know if it is a print or something large like this.

ASM_No Number 2

Valdez in 1903. 1903 Miles Bros image, Alaska State Museum. Strange brown stain, could this be burned? Also, the shattered flaking in the sky is seen on several of the images, but often in lighter areas?

ASM_No Number 3

Pioneer’s Home and Garden at Valdez. 1903 Miles Bros image, Alaska State Museum

ASM_No Number 1

Crossing Copper River. 1903 Miles Bros image, Alaska State Museum

ASM_V_C_11

Tonsina Crossing on the Trail Between Valdez and Fairbanks. 1903 Miles Bros image, Alaska State Museum V-C-11

ASM_UA-UC_133

Horses Crossing the Kotsina, A Branch of the Copper (?) River. 1903 Miles Bros image, Alaska State Museum UA/UC-133

ASM_V_C_10

On Elliott Creek, Copper River District. 1903 Miles Bros image, Alaska State Museum V-C-10

ASM_V_C_13

Typical Prospector’s Camp. 1903 Miles Bros image, Alaska State Museum V-C-13. Another one with a broken edge. You can see we propped these up on a light table just to get some record of what they look like…


IMG_2875

Fire Department at Circle. Sunset at Nome. 1903 Miles Bros image, Alaska State Museum UA/UC-360. The hands give a sense of scale for these glass plates. The scale gives an intimacy to the image beyond a normal sized photo.

IMG_2877

Detail from Fire Department at Circle, Sunset at Nome. 1903 Miles Bros image, Alaska State Museum UA/UC-390. Note how the message on the fence says, “RING LIKE H-L IN CASE OF FIRE.”

IMG_2876

Another detail from Fire Department at Circle City. Sunset at Nome. 1903 Miles Bros image, Alaska State Museum UA/UC-390. Look at that good dog! How about the moustache/beard?

IMG_2878

Detail of the wood and copper framing typical of those that have frames

V-C-12

Star City on the Yukon River. 1903 Miles Bros image, Alaska State Museum V-C-12. Note the uneven lighting behind this one, makes the image hard to read. This one is on exhibit right now, and the light bars behind it are not so bad in person.

ASM V-C-12

Detail from Star City on the Yukon River 1903.     Miles Bros image, Alaska State Museum V-C-12. Look at the fur and the texture of the harness!

ASM_UA-UC_139

The Garden of Pioneers in Interior. 1903 Miles Bros image, Alaska State Museum UA/UC-139. Note the paper stuck to the back of this one. Many of these are missing the back piece of glass, making them very vulnerable.


ASM_UA-UC_134

Pioneer Cabin. 1903 Miles Bros image, Alaska State Museum UA/UC-134. Look! This one has been hand colored. In some areas you can see fingerprints.

ASM_V_C_8

Sunset on the Yukon. 1903 Miles Bros image, Alaska State Museum V-C-8

ASM_UA-UC_135

Eskimo Children of St Michael. 1903 Miles Bros image, Alaska State Museum UA/UC-135. Unfortunately, the area of two of the faces is completely missing here.

ASM_UA-UC_132

Eskimos Carving Ivory…Reindeer Camp. 1903 Miles Bros image, Alaska State Museum UA/UC-132

ASM_UA-UC_138

Ducks…near Nome. 1903 Miles Bros image, Alaska State Museum UA/UC-138. Note the strange rounded damage areas near the bottom center. Is this mold perhaps?

ASM_V_C_15

Sunset at Nome. 1903 Miles Bros image, Alaska State Museum V-C-15

ASM_UA-UC_131

Winter Came to the Arctic Sea. 1903 Miles Bros image, Alaska State Museum UA/UC-131


Chinese Chests on the Northwest Coast

August 4, 2017

IMG_1459
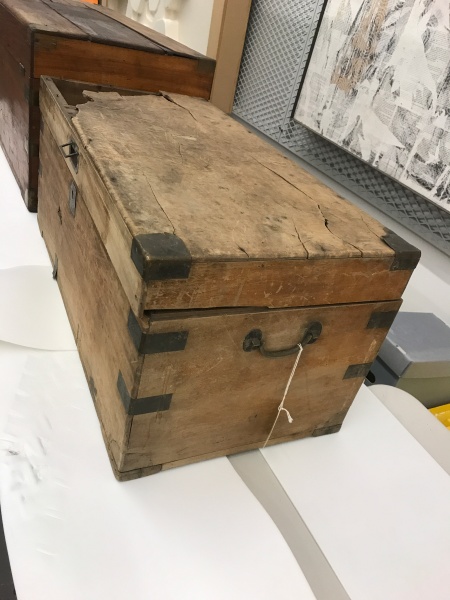
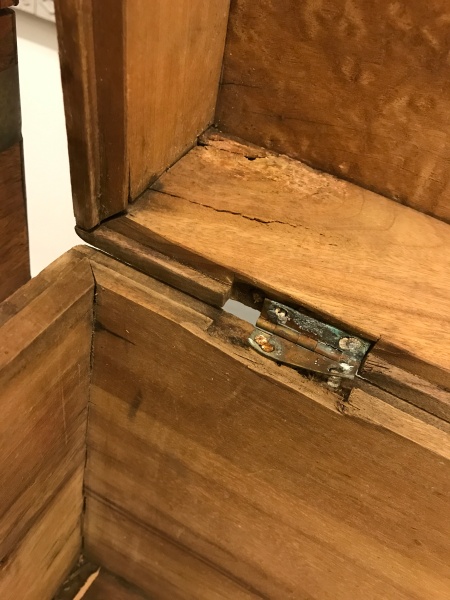
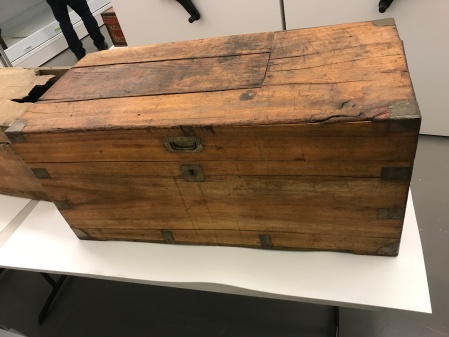
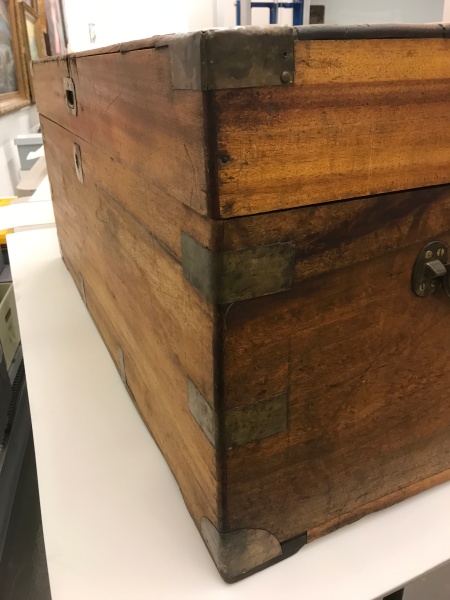
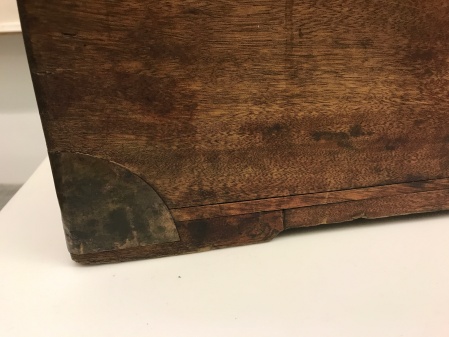
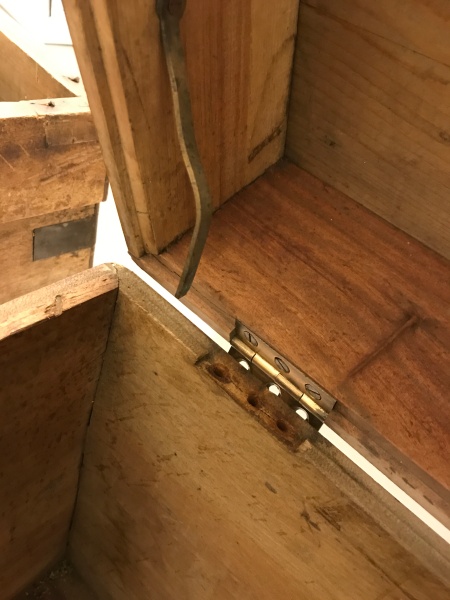
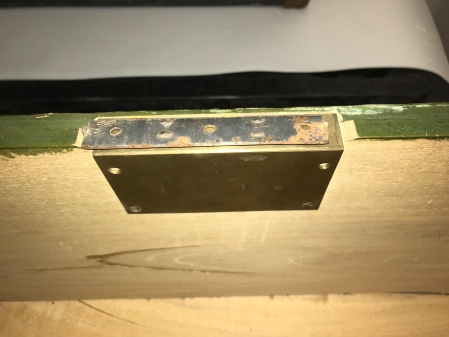
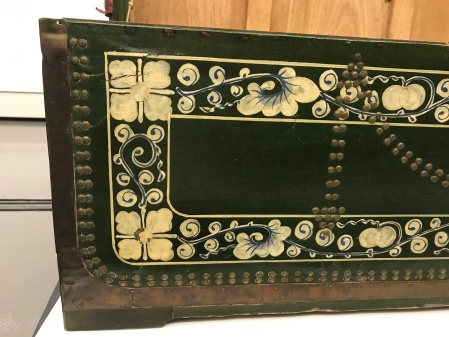
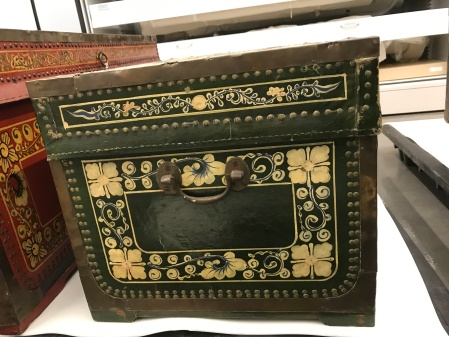
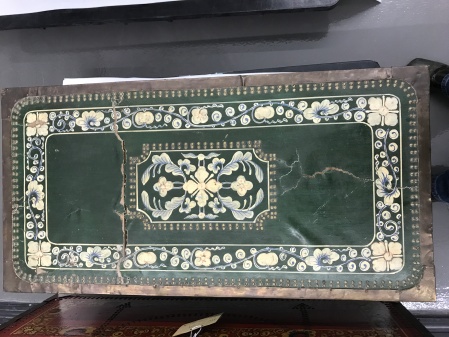
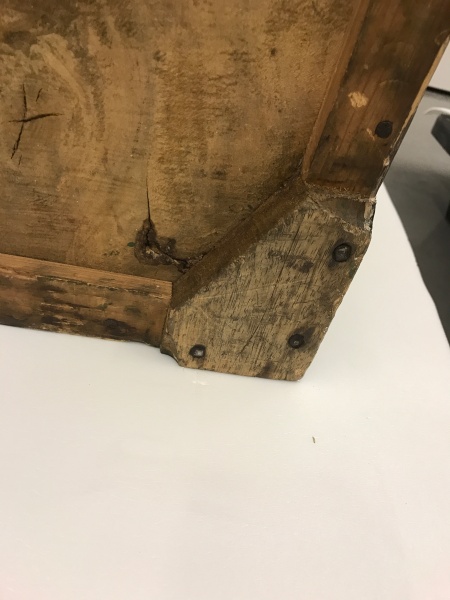
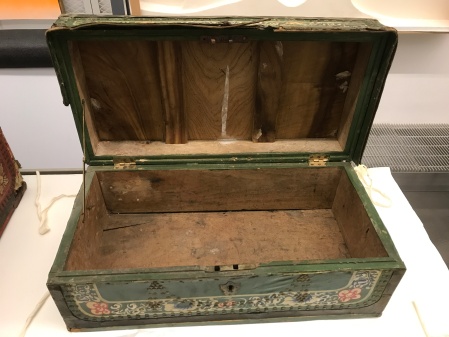
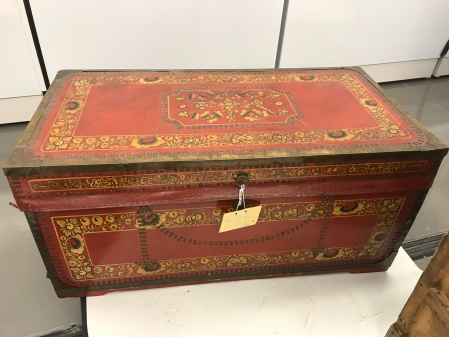
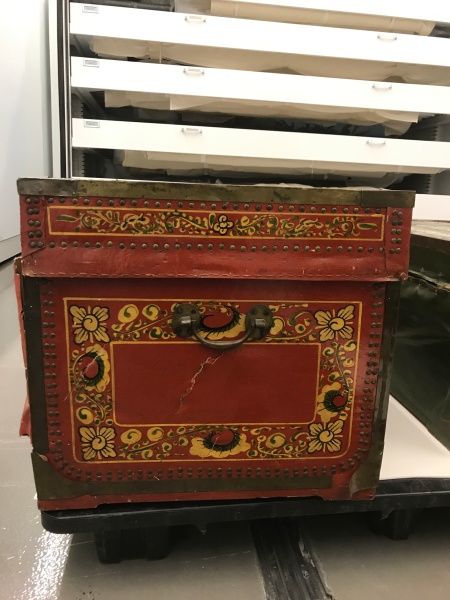
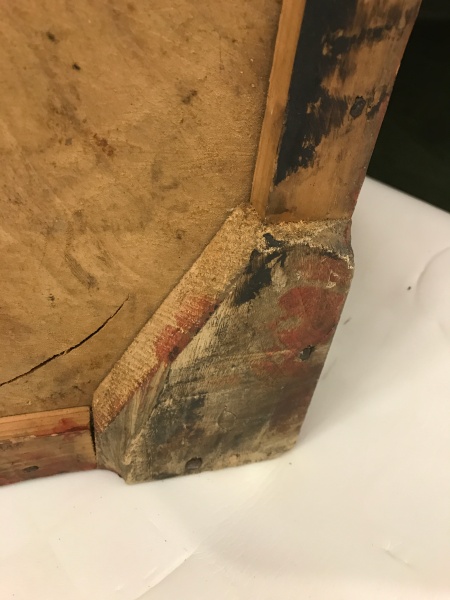
This posting is a gift for a certain clan caretaker and woodworker who is interested in making some of these chests. It is easy to find photos of the exterior. This post is heavy on the visuals and interiors, to help understand the construction technique.

These chests are ubiquitous in museum collections that include Tlingit and Haida material culture, even small museums in Southeast Alaska tend to have several of them. Alaska State Museum Curator of Collections Steve Henrikson has a research file on these chests, and added the following information into the museum’s database regarding them:

“These chests were made in China beginning in the mid 1800s or earlier for the export market. They were popular in Europe and the United States, especially during the Victorian era. In Alaska, these chests were very popular among the Tlingit and Haida people, who used them for storage of ceremonial regalia, clothing, and other property. The resins in the camphorwood were believed to have repelled moths and other insects. There are two basic forms of Chinese camphorwood chests that were traded in Alaska: one made of varnished boards, and the other made of boards covered with painted pigskin. Both have brass hardware and reinforcements on the corners and edges. The pigskin covered chests are also decorated with rows of brass tacks, which usually outline the brass fittings…. To save room in the ships’ holds, the chests came in at least 3 sizes, and designed to nest together; the smallest chest contained a stash of Chinese tea. The earliest visual representation of these chests is a drawing by I.G. Voznesenskii of a Sitka potlatch ca. 1844; other seafarers mention purchasing chest in China even earlier.”

ASM 92-13-1 from Yakutat 37″L x 17 1/2″W x 16 1/2″H

Here is one with no painted pigskin on the outside. Nice dovetail details in the corners.

IMG_1364IMG_1363IMG_1362IMG_1365IMG_1366IMG_1367IMG_1369

ASM 91-48-1 from Old Kasaan, early 1800s. 33″ L x 16″W x 14 1/2″ H

Another plain one, no tack holes so we know it never had pigskin covering. Sometimes things that are a little damaged reveal the most about methods of manufacture. The way the corners are done on this one is really nice. Also, you can see how the brass parts are set in…the wood is ever so slightly recessed so the whole surface will be flush after the brass is added.

IMG_1373IMG_1374

IMG_1376IMG_1379IMG_1380IMG_1381IMG_1383

ASM 90-17-1 from Sitka, the Wolf House, Gootch Hit. 1790-1850.

38 1/2″L x 18 1/2″W x 15 1/2″H

One more plain one without leather. Notice how the lock mechanism is similar on the three plain ones. Also, this one seems to have a repaired area on the lid? Generally each side of these chests was a single big plank. On all the chests the lock on the front face is met along the edge with a beveled feature on the wood.

IMG_1460IMG_1461IMG_1462IMG_1464IMG_1465IMG_1467IMG_1469IMG_1470IMG_1471IMG_1472

IMG_1474

ASM III-O-128 unknown provenance 34 1/2″L x 17 1/2″W x 15 1/2″H

Most of the painted ones I have seen are green or red, with perhaps red being more common? The foliage design I have once or twice seen on carved silver bracelets. I guess camphorwood is the equivalent of cedar in some ways, highly aromatic and with an insect repellent quality to it. That would be quite important in keeping pests away from wool robes, furs, feathers, and other elements on regalia that might be at risk for infestation.

IMG_1423IMG_1424IMG_1425IMG_1426IMG_1427IMG_1428IMG_1429IMG_1430IMG_1432

ASM 95-37-4-3 from Wrangell 23 1/4″L x 11 1/2″W x 9 1/2″H

This one is the baby brother of the two that are on display in the first image. This size is the smallest of the typical sizes, and you’ll see the underside is different. No “feet” on this one. This seems typical of the small ones.

IMG_1404IMG_1405IMG_1406IMG_1407IMG_1408IMG_1411IMG_1412IMG_1413

ASM II-B-1584 unknown provenance 39 1/2″L x 20 1/4″W x 18 1/2″H

This is the largest one in the Alaska State Museum collection. You’ll see the back is undecorated. That seems typical, too. Front, sides, and lid tend to have the foliage decoration (sometimes including birds) but I have not seen the back decorated.

IMG_1435IMG_1436IMG_1437IMG_1438IMG_1439IMG_1440IMG_1441IMG_1442IMG_1445IMG_1448IMG_1449


II-B-1367 unknown provenance 35″L x 17 1/4″W x 15 1/2″H

The leather and the wood react to changes in humidity differently, but they are not allowed to move independently because they are tacked all together by the brass tacks and trim. Consequently, almost all of these pigskin-covered chests I have seen have extensive tears in them. Treatment-wise, the most straightforward repair would be to insert a layer behind the tear that would match, and tack the edges to it as best as possible. The chain on this one is not original. Typically they have hardware like the previous one.

IMG_1415IMG_1416IMG_1417IMG_1418

IMG_1421


Thin brittle furskins?

February 15, 2017


Hi Folks!


Looking for some input on approaches to thin brittle skins of small furbearing creatures. I’m thinking of garments made of rabbit, hare, and arctic ground squirrel in particular, where the skins are sewn together and we often see tears through aged or brittle skin that threatens the integrity of the garment. Included here are some specific images and examples.

dscn6454

ASM 20098-18-1 seal parka with a rabbit or hare trim. There are tears in the ringed seal skin, but it is the disintegrating cuffs that trouble me more treatment-wise.


detail-pr-cuff

pl-cuff

Below are some images of a coat that belonged to beloved photographer Michio Hoshino.  The garment has some substantial tears that make exhibition difficult.

hoshino-coat-2

hoshino-coat-3

hoshino-coat-1

I know there are many people in Alaska who have beautiful parkas still in use and much treasured, and when they begin to tear there are difficult decisions about when and if to wear them as well as whether they can be passed down to daughters and granddaughters for continued use. Sometimes the skins are still flexible, and other times they are brittle and cracking. For the reasonably supple ones, lining with Reemay and BEVA 371 film is a decent approach. But brittle skins of course have a lower shrinkage temperature due to degradation and heat set adhesives are more risky. For garments that are bearing the stress of their own weight or will be in active use, maybe there is a way to stabilize the damage while also making the garment more robust, perhaps with a supplementary lining that extended to more stable seams. Looking forward to your thoughts!


SLAM PROJECT 2016: Oil and Timber Section

May 5, 2016

Hi Folks!

It has been more than a year since I last posted, and it would be an understatement to say we are working hard. SO much has happened in the past year! I promised myself I’d keep this one short and just get blogging again, so here is a glimpse of conservation from the Oil and Timber Section we recently installed. YES installed, Opening Day is June 6!

IMG_5642

How about this gorgeous chainsaw? Gotta start with an image of Alaska State Museum registrar Andrew Washburn, we’ve been with the artifacts through the whole process and keeping track of the info at breakneck pace. Documentation!!! And really interesting conversations about the strangeness of the out-of-context museum world and what it means for artifact interpretation. In conservation, we have been endeavoring to make industrial objects look reasonably cared for without removing evidence of their useful life. Andrew’s pose captures our discussion about which way the blade faces.

IMG_8747

Iron! Here we have a couple of boom chains. The blacker one was treated with OSPHO and the lighter one got a tannic acid treatment. Most of the iron that needed help from the collection got tannic acid and stayed brownish. The brown boom chain was the one selected for exhibition. Incidentally, there were some prop desk legs also treated with OSPHO…they accidentally got wet and a tough white substance showed up on the surface. So difficult to remove! Anyone have experience with that white crust? In general, I wouldn’t OSPHO a museum object but if a blackish appearance is desired a controlled phosphoric acid like OSPHO does the trick. If the white crust had happened on a museum object, that would have been a disaster.


IMG_9491

A giant round of spruce. For many many years this was an exhibit prop in the old museum and treated as such. When I came on staff in 2006, it was strapped to the basement wall and only recently been added to the permanent collection. This sturdy iron support had been added years ago to support a large crack. Note all the disfiguring drips.

IMG_0145

Most invasive treatment of my life: I took a Festool sander to the face of this spruce round to remove severe staining. I’ll spare you the long in-house decision making process that made that choice even possible, but suffice to say I am in love with Festool now. When the spruce round had been an exhibit prop, there were also large holes drilled to mark certain rings as a timeline. Paintings conservator Gwen Manthey is shown here filling and inpainting those holes. There were four holes, but I dare you to find them now!

IMG_4924.JPG

Here is the jacket Click Bishop wore back in his days working on the oil pipeline. Yes, that Click Bishop, the Alaska State Senator. There are pants and hat with this outfit too. Here is an image of humidifying the pocket flaps so they would lay flat when the mannequin was dressed.


SLAM Project 2015: World War II Section

March 18, 2015

Here I continue to post snapshots of the conservation work ahead for our upcoming new exhibits.  The Alaska State Library Archives and Museum (SLAM) project is in the construction phase, with opening of the new building planned for June 2016.  There are approximately 22 interpretive areas, around 90 exhibit cases, and roughly 2,500 objects. This section is about World War II, an area of the collection that has grown significantly in the past few years.  This is one of the areas that will be mannequin-intense, as we have quite a few uniforms from different service branches. Here are some of the artifacts that need some extra care from conservators.

ASM 2013-61-1 these remarkable fur lined pants have some tears that need to be repaired.

ASM 2013-61-1 these remarkable fleece lined pants from the Army Air Corps have some tears that need to be repaired.

The zipper of the pants suffers from tooth loss and corrosion.  This needs to be stabilized, and the display details strategized if the zipper cannot be zipped.

The zipper of the pants suffers from tooth loss and corrosion. This needs to be stabilized, and the display details strategized if the zipper cannot be zipped.

This barracks box from the Aleutian campaign contains clothing that must be addressed.  It may need to be vacuumed, and the arrangement and support of the garments in the box needs to be determined with aesthetics, interpretation, and long term preservation in mind.

This barracks box from the Aleutian campaign (ASM 96-59-1) contains clothing that must be addressed. It may need to be vacuumed, and the arrangement and support of the garments in the box needs to be determined with aesthetics, interpretation, and long term preservation in mind.

This USCG shirt (ASM III-O-856) is in great condition, except for the spotty staining overall that may be from mildew during storage before it was donated.  Stains on white fabrics are notoriously difficult to remove.  Still, I think we will try...

This USCG shirt (ASM III-O-856) is in great condition, except for the spotty staining overall that may be from mildew during storage before it was donated. Stains on white fabrics are notoriously difficult to remove. Still, I think we will try…

This gas mask, III-O-165, has a lot of rubber components that are still flexible, but who knows how long that flexibility will last?  Can we come up with a support system that will allow the item to be interpreted and studied in the future even when it gets stiff?

This gas mask, III-O-165, has a lot of rubber components that are still flexible, but who knows how long that flexibility will last? Can we come up with a support system that will allow the item to be interpreted and studied in the future even when it gets stiff?

The canister of the gas mask has some corrosion.  This needs to be characterized and stabilized.

The canister of the gas mask has some corrosion. This needs to be characterized and stabilized.


ASM III-O-364 is a Japanese charcoal burning stove.  Staff here are very fond of its industrial design elements.  Inside there is a lot of dirt and rocks.  We will need to determine if those are to be kept inside or not.

ASM III-O-364 is a Japanese charcoal burning stove. Staff here are very fond of its industrial design elements. The inside is full of dirt and rocks. We will need to determine if those are to be kept inside or not.

This Japanese rifle, III-O-240, has areas of corrosion and some elements that might be bent or out of position.  It is an Arisaka Model 99 collected at Kiska.

This Japanese rifle, III-O-240, has areas of corrosion and some elements that might be bent or out of position. It is an Arisaka Model 99 collected at Kiska.

The strap of the rifle is actively flaking an orange powder.  This material will need to be characterized and stabilized before it can go on display.

The strap of the rifle is actively flaking an orange powder. This material will need to be characterized and stabilized before it can go on display.

In this image, paper conservator Karen Zukor is examining and testing a watercolor painting from 1943 Adak Island by Warren Beach.  The artwork has some severe spotty staining on the back that is beginning to show through to the front.  A later to posting will detail some of our strategies to control light levels in the upcoming exhibits.

In this image, paper conservator Karen Zukor is examining and testing a watercolor painting from 1943 Adak Island by Warren Beach. The artwork has some severe spotty staining on the back that is beginning to show through to the front. A later to posting will detail some of our strategies to control light levels in the upcoming exhibits. This painting will need treatment before exhibition.


SLAM Project 2015: Maritime Section

March 17, 2015

Here is another snapshot of the conservation work ahead for our upcoming new exhibits.  The Alaska State Library Archives and Museum (SLAM) project is in the construction phase, with opening of the new building planned for June 2016.  There are approximately 22 interpretive areas, around 90 exhibit cases, and roughly 2,500 objects. This section, Maritime, has a LOT going on!  Anjuli Grantham was here from Kodiak earlier to help with some artifact selection and history, Tim Troll and Andrew Washburn have both told me a lot about the Bristol Bay fishery, and I’ve been in touch with Louie Bartos at least weekly for some time now getting a replica sail made.  Here’s a link to an article about that sail by Megan Petersen at the Ketchikan Daily News, and another article by Matt Martin over in Dillingham for public radio station KDLG.

ASM 97-34-1Bristol Bay Double Ender, a fishing boat that will go on display, rigged with a new sail made by master sail maker Louie Bartos, and film footage will be projected on the replica sail.

ASM 97-34-1 Bristol Bay Double Ender, a fishing boat that will go on display, rigged with a new sail made by master sail maker Louie Bartos, and film footage will be projected on the replica sail.

Tim Troll saw the boat, and had lots of good info.  Here he is looking at the sprit, part of how the sail was held up.  Tim thinks we ought to paint the boat.

Tim Troll saw the boat, and had lots of good info. Here he is looking at the sprit, part of how the sail was held up. Tim thinks we ought to paint the boat.

Here's a plaque inside, I don't know exactly what the numbers stand for.  It was from the Libby McNeill & Libby cannery, and would have been a peachy orange color originally.

Here’s a plaque inside, I don’t know exactly what the numbers stand for. The boat was from the Libby McNeill & Libby cannery, and would have been a peachy orange color originally.

We have two sails that go with this boat, but didn't want to fade a rectangle into one by projecting film footage.  So I took the sail to the loft studio of Louie Bartos so he could measure and make a replica for us.

We have two sails that go with this boat, but didn’t want to fade a rectangle into one by projecting film footage. So I took the sail to the loft studio of Louie Bartos so he could measure and make a replica for us.

I first heard of Louie at the WOAM conference back in 2010.  An internationally renowned sail expert right in Ketchikan!  How could we pass up the chance to get a sail made? Here Louie shows a couple of his sailmaking palms...

I first heard of Louie at the WOAM conference back in 2010. An internationally renowned sail expert right in Ketchikan! How could we pass up the chance to get a sail made? Here Louie shows a couple of his sailmaking palms…the thumb goes through the big hole.  When you make a sail, you need more than a thimble…

We've got a rudder, and will use it.  But will need to make a replica mast because the ceiling is just not quite high enough. And we will probably buy new mast hoops because the originals are rather delicate now.

We’ve got a rudder, and will use it. But will need to make a replica mast because the ceiling is just not quite high enough. And we will probably buy new mast hoops because the originals are rather delicate now.

More photos of Maritime Section stuff below, but I have to make a pitch for our WISH LIST of things we would like to add to the Alaska State Museum collection for interpretation and to include in the display of the Bristol Bay Double Ender.  I think we could find loans of most of this, but ideally we would like to add items to the collection that come from the Bristol Bay fishery from this historic period…

  • Roller (that gadget that helps pull the net up without rubbing on the boat)
  • Cleats associated with roller
  • Oarlocks
  • Bailing Cans
  • Bilge Pump (the one that was supposed to come with the boat went missing in Homer)
  • Tent
  • Stoves: both the “Swede Style” and the “Italian Style”
  • 5 gallon water beaker
  • Old box compass, a few inches on a side
  • Old cannery dishware
  • Samples of caulking and caulking tools
We are putting out quite a few salmon cans, and their labels are quite marvelous.  We will be devising various methods of monitoring the risk from light fading for items like this.

We are putting out quite a few salmon cans, and their labels are quite marvelous. We will be devising various methods of monitoring the risk from light fading for items like this. (ASM 2000-39-1)

This is a stencil set from a cannery, and needs to have the dead spiders and dust removed without losing its authentic grime.

This is a stencil set from a cannery, and needs to have the dead spiders and dust removed without losing its authentic grime. (ASM 2005-9-36)

Several folks on staff are excited about this stencil from a boat called the Goldywn.  However, how to unroll and flatten it, how much to unroll, and whether to include the chunk of oar handle are tricky conservation dilemmas.

Several folks on staff are excited about this stencil (ASM III-O-635)  from a boat called the Goldywn. However, how to unroll and flatten it, how much to unroll, and whether to include the chunk of oar handle are tricky conservation dilemmas.

This deadeye, ASM II-O-290 from the Star of Bengal has some serious spalling rust issues.  Staff are disturbed by the resemblance to a skull, given the history of the ship...one of the worse maritime disasters in Alaska history...more than 110 Chinese cannery workers perished in the wreck.

This deadeye, ASM II-O-290 from the Star of Bengal has some serious spalling rust issues. Staff are disturbed by the resemblance to a skull, given the history of the ship…one of the worse maritime disasters in Alaska history…more than 110 Chinese cannery workers perished in the wreck.

This huge wok, ASM 2000-4-1 also has some rust issues.

This huge wok, ASM 2000-4-1 also has some rust issues.


We have quite a few instances like these lure where the object numbers have been put on in a place that is not the best for display purposes. (ASM 98-40-1).  We'll need to remove the numbers and re-label these lures.

We have quite a few instances like these lures where the object numbers have been put on in a place that is not the best for display purposes. (ASM 98-40-1). We’ll need to remove the numbers and re-label these lures.